• Home
  • #Building101
    • Building Financial Template
  • Shop with Me
  • Lifestyle
  • About Me
  • Contact Me
  • My Account
  • Cart

Forever.Six.Acres

Categories: Uncategorized

Secretary Desk

Refinishing secretary desk

Hey, hey y’all! Soo excited to share this big project with y’all! I had been looking for a secretary desk for a while to put in the great room. Ever since I was little, I wanted a secretary desk, I’ve always thought they were so pretty! I love that you can just close the top and tuck everything inside away. I found this gorgeous solid wood secretary desk at a local antique shop, and I waited a full week before buying it. It is really old, and needed lots of work!

So I’m not sure about this desk’s background. There isn’t a stamp or writing anywhere on it to give me a clue about how old it is. What I do know, is that it’s solid wood, and there are many pieces that don’t match up very well, so I feel like someone made this in their shop at home. It’s very primative. Not a piece of vinyl on it! Which is exactly what I wanted, because I knew I could do the oven cleaner method on it since there wasn’t vinyl, except for that piece of vinyl leather. 😉

Supplies Needed

So after it home, I was able to check it out a little deeper than in the store. I realized then that this is going to be a lot of work! Haha! I needed these items for sure!

  • Wood glue (You might need, depending on how much work your piece needs)
  • Minwax Stainable Wood Filler
  • Barkeepers Friend (for cleaning hardware)
  • Easy-off Flume Free oven cleaner (I used about 7 cans total)
  • Sand paper (80 grit, and 120 grit comes together in this kit linked)
  • Scrub Brushes (in various sizes)
  • Bucket
  • Dawn Dish Soap
  • White rags
  • Dish Gloves
  • Tarp to cover flooring (if needed)

I’ve put links to as many of these products as possible to help you find the supplies quick and easy! Please know that I get a small commission from the brand if you purchase something through my link, but it’s at no extra cost to you!

First steps

The first thing I did was remove the hardware to clean it. It was still really cold outside, and I knew I could do this in the garage to hide from the cold wind, but still get good ventilation if needed.

On the back of f Bar Keepers Friend, there was directions to clean the hardware, and I followed those! I laid down my tarp, spread out the hardware, dunked them all in water, then sprinkled on the Bar Keeper’s Friend. Then, I let it sit for a few minutes, then got a white rag and started to wipe it all off. Once I rubbed off the powder, I dipped it back in the water, and dried it with the towel. There were a few tough spots I had to do again, but for the most part, it all came off the first time! I forgot to take photos, but I got lots of video!

I did take a before and after photo of one of the pulls. It doesn’t make them all perfect, but the Barkeepers Friend, really puts some life back into them! Also, I lost one of the little pull knobs for one of the small drawers inside the desk, and I’m pretty heartbroken about it! Hoping I find it in the driveway somewhere, or in the garage under something one day! *Fingers crossed*

before and after of the hardware dirty and clean

Secretary Desk – The Easy-off Way

So to make sure this was going to work, I did a test run on a small drawer. I chose to do the Easy-off oven cleaner method after seeing so many gorgeous projects refinished with it by @Vintageporch . Her blog has been so helpful through this whole process for me!

So I sprayed on a generous amount of the Easy-off on the front and inside of the drawer. My patience didn’t do me any good, cause I scrubbed it off with water and soap in about 10 minutes. This was the result. Got a good amount off, but not all of the layers of stain.

one drawer done with oven cleaner.

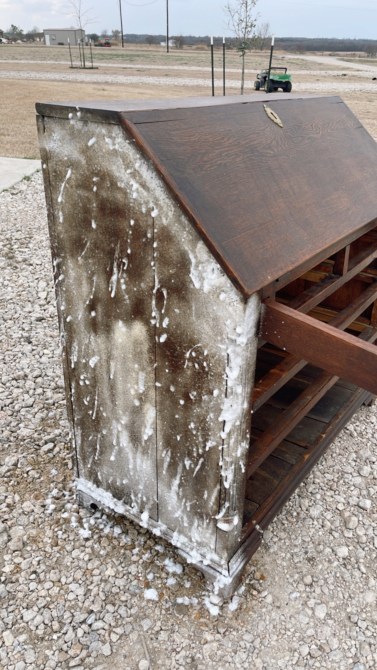
So, a few weeks later when the weather was much warmer, I decided to knock it all out! I did a generous coat of oven cleaner on the whole thing. Working in specific sections so I could time things out for the cleaner to sit longer. At first, the cleaner sprays on thick, but then it quickly becomes thin. Some areas work really quickly on the stain, and you can see it start to change color. Some images below show that!

Oven cleaner after sitting on the wood for about 5 mintues.
oven cleaner on the secretary desk
Oven cleaner on the back of the secretary desk.

So, one thing I learned, is that the longer the oven cleaner sat, the better! I let the oven cleaner sit for about 30 minutes before I started to scrub it off with water, and dish soap. I would occasionally dump out my bucket, and get fresh water and soap. Video below show that when I scrub off the oven cleaner, you can see that the stain starts to scrub off, but it doesn’t look as light as it will when it drys!

Scrubbing is super important!! It really helps remove the stain off, and it makes it easier for you to get in all those small detailed spots. The tough part with this larger scrubber though was getting the back and small spots on the inside of the desk. So I suggest purchasing a variety of sizes. I have some linked above! I used a toothbrush too, but I found that a grout cleaner brush worked best since the bristles are stiffer than a soft toothbrush.

Tip: Don’t dump it in your grass, I’ve heard that it will kill the grass. So I dumped it out in my rock driveway, where I don’t want the grass or weeds to grow!

scrubbing off the oven cleaner with water and Dawn dish soap

This last image shows how the desk looks after one layer of Easy-off and it dried completely. There were a few spots that I needed to go back and sand. I learned really quickly that scrubbing is very important. I had to do the Easy-off twice on the inside of the desk. There aren’t many photos for that process, cause I was too busy working on the project! Also the image above is so crooked because it was a screenshot of one of my stories on Instagram. *insert face palm*

Once everything has been scrubbed, it’s time for a good wash down. We used our power washer, but you could also use a hose. I felt like the power washer really got the cleaner and stain junk off really good! I let it air dry for a few days before I decided on if it needed more, or if I could move on.

Secretary Desk- The Tough Parts

Now, the Easy-off got a TON of the stain off, and it looked so much better. It was definitely an easy process. I decided to go over the larger area with a sander (80 grit) to get a even, smooth feel to it. I also had to use a LOT of 80 grit sandpaper from all the glue under the faux leather vinyl that was on the pull down desk. Using a scraper, I got the backing of the faux leather off, but the glue wasn’t budging. I even tired Goo Gone. Picture below is after scrubbing cleaner off, but before power washing.

scraping the faux leather backing off desk.
scraping off faux leather backing, but used a sander to get glue off.

For the glue, I used 80 grit sandpaper and sanded it down. This worked perfectly! I was nervous that it would look different since it was sanded down and not stripped with oven cleaner, but it looked the same.

sanding down glue
Sanding glue, you can see the glue and some wood filler on the bottom left corner.

A few other things that made this project tougher, was that this desk is soooooooo old, and it needed a lot of repairs. We used wood glue for many of the pieces that were broken. Some areas we were able to use a small nail to put it back in its place. One major thing we did was remove the little center cabinet inside. I realized about half way into this project, that my Macbook wouldn’t fit inside. Oops 🙂 !! Jeremy removed the little cabinet, which was much easier than I thought. Then I had to sand down that area again, so it could match the other areas of the desk. I personally don’t think I would have ever used the cabinet anyways!

Jeremy also fixed the back right leg, used some wood glue to glue some of the drawer bottoms back in place, fixed the left pull out support from wobbling all over the place.

To seal, or not to seal?

That is the question and I’ve learned my lesson! Ha! I really wanted to do a wax matte sealer, but the one I wanted was sold out everywhere, even in stores or on Amazon! So I went to my local Sherwin Williams, told them what I wanted, and the suggested this Minwax Polycrylic matte clear sealer! I tried it out on the bartop below our kitchen window outside, and I LOVED it! But when I applied it to the secretary desk, it changed the tone ever so slightly to the wood, and I was not feeling it. I wanted this piece to be light and raw looking. Even though it was a matte sealer, my artist eyes could tell a difference.

So I sanded down the entire outside of the desk. I left the inside with the sealer on it just because it will get lots of wear and tear. I’m sure I’ll have my cup of coffee next to me while working, and I would hate to spill something and it soak all up in the wood. Now, please don’t think that this sealer isn’t good. It’s just not what I wanted!

Final Refinish

As I am working on this post, I am sitting at my little mini office space in the great room. She fits so perfectly in this spot like she was always meant to be here. I have always struggled with decorating this space ever since we moved in. It never felt “right”. Now, it feels right! Tell me your thoughts on this process?? Have you done it, or do you have a piece you want to try it on? Comment below, and as always, thanks for reading y’all!

signature
Categories: #building101, Uncategorized

#Building101 – Choosing a Builder

Choosing a builder

Choosing the right builder can be one of the first big decisions you have to make when starting the building process. If you are building a spec home, normally there is one builder that builds up the houses in that community. Which has it’s advantages and disadvantages. It makes the process of finding a builder easier, but you might not like that particular builder. Choosing a builder for building a custom home is a little more complicated. So I wanted to create a blog post specific to this topic!

Shopping Around when Choosing a Builder

When you start shopping around for a builder, there are many things to consider. Two of the major choices to consider are if that builder is within your budget, and if they are someone you can work with for the next 9 months or so.

Let’s start with how to go about looking for builders around your area. Personally, I think the best way to find a good builder is to ask others that have recently built with that builder. Word of mouth is a great way to really get good feedback about builders. Of course, if they have any type of website, or social media is another good way. But authentic and informative feedback comes best from personal experience. Most websites or social media accounts for builders want positive feedback to display.

When talking to someone who just built with that builder will be able to give you insight on what it was really like to build with that person. It is a good way to get an idea on what you will be working with throughout your building process. You might get some negative feedback, which is also valuable to you, because then you know what to avoid!

Questions to Ask

Listing some good questions you might want to consider asking your builders!

  • Do they work with a specific architect, or are they open using anyone?
  • Have they built a home similar to the style and design of home you want?
  • What is your price per sq. ft. and how do you determine that price to make it as accurate as possible?
  • How long does it take for you to create your estimated bid?
  • How long does it take to build a home like we want?
  • If we have a sub contractor we want to use that is different from yours, would you be okay with that?
  • Do you have a one year fix and touch ups warranty?
  • Will it be only you we are working with, or is there an assistant we will be working with too?
  • What is the best way to keep everyone involved and communicating? We don’t want any miscommunications.
  • Will there be regular meetings scheduled, or will they only be done upon request?
  • How do you determine the builders fee? Is it a fixed fee, or is it a cost plus fee?

Comparing Builders to Builders

Now, it’s important to compare a few different builders. Try not to go for the first one you meet! They might be a good fit, but it is always a good idea to check out other builders to see if there might be a better fit! When comparing builders to builders you want to keep in mind that you are going to get what you pay for. You can chose the best builder in the city, but you are most likely going to pay some of the top prices.

You will want to meet with each builder face to face, or at least zoom, so you can get a good first impression of each builder you meet with. This will help you get a feel for them as a builder, information about the subcontractors they work with, building processes, estimated time frame, and if you feel like they would be a good communicator. Communication is KEY when you are building! Not only between you and your builder, but also you and your spouse!

It is also nice to actually see your builders work! Ask if you can see a current project they are working on and a recent completed home they built. This is almost like a “portfolio” if you think about it. It gives you an true visual of their work!

How do you Know if a Builder is Within your Budget?

Builders usually give estimates of their price per square foot. The price per square foot varies depending on your location. Our home is probably worth twice as much, or more if we built it in California. It’s good to get quotes from different builders to see the price range of several builders.

Calculating your budget is simple. Take your square footage on your house plans, and then you multiply it by the price per square foot. This gives you a good estimate of what it would cost to build a house.

To make sure your builder can give you an accurate price per sq. ft. then it’s a good idea to have a general outline of your house plan, that includes the square footage. Also try to give him some of the big design or features you want to include in your home.

We let our builder know that we wanted to have about 2,300- 2,400 sq. footage to give him a good estimate of what we plan to build. We also told him the major things that make cost differences, like we originally wanted brick on the lower part of the house (we decided to just do board and batten), and board and batten everywhere else. I let him know I wanted vaulted ceilings in the living & dining area, and that I wanted wood beams. There would be lots of brick accents, and shiplap throughout the house. We also told him we wanted LVP flooring and solid wood double doors. All these details helped him give us a better sq. ft. price.

Farmhouse interior with vaulted ceilings and wood beams
Wooden beams, shiplap shiplap accent walls, brick fireplace, and LVP floors.

I could tell you what it cost to build our house, or I what the builder told us the price per square foot was estimated to be, but in all honesty, that won’t help you! The economy is completely different now, then it was when we were building. Lumber prices have almost gone up 80% since we built! Not only that, but builders prices vary all around the united states. They can even vary with in local areas. The prices around my small town varied from $115- $145. Now I’m sure the prices vary from $130-$175 per sq. ft.

Builders Gotta get Paid, too!

There are different ways that builders determine how they get paid to build. Our builder had a set, or fixed, fee of what he was going to get paid. It was about $25,000. My parents recently built and they used a different builder. His fee was based on a percentage of the overall cost to build the home, and I think their builders fee was about $50,000-$60,000. Of course their house cost more to build than ours, but if we would have used the same builder as them, our builders fee would have been more that that set fee we paid. So keep in mind that builders get paid differently and you want to see if they will work with you on that!

Choosing a Builder that is Not too Hot, Not too Cold, but Just Right!

Yes, I just compared choosing the right builder to Goldie Locks and the Three Bears but it’s kind of true though! You will find builders that are too over the top, and only want to do things their way. You will find builders that don’t get involved much, and scoot by each house barely meeting the needs of their clients. Eventually, you will find a builder that is just right for you!

Hoping this covers questions you might have about deciding on how to chose the right builder! After you chose your builder, you are just one step closer to creating your dream home! As always, leave a comment below if you have any questions! Also, don’t forget to subscribe to the blog emails, so you don’t miss out on any upcoming posts! I also talked a little about this on my Instagram #building 101 series. I talked about this a while ago, but you can find it saved on my highlights!

signature

Hey y’all!

About me

Hi, I'm Tiffany! Welcome to the Forever.Six.Acre's blog where you will find helpful building tips and advice, home design and decor, be able to shop my looks, and get a little insight from living on 6 acres with a family full of boys! Read More…

  • Email
  • Instagram
  • Pinterest

Subscribe to Blog via Email

Enter your email address to subscribe to this blog and receive notifications of new posts by email.

Join 304 other subscribers

Search the blog

Instagram

➕Pick one➕ You can only pick one. It’s a to ➕Pick one➕

You can only pick one. It’s a tough option for sure. Which is your favorite view from the kitchen island? The kitchen view, or the dining and living room view?! 

So hard to decide with the brick, and the beams! I think my vote would be the brick kitchen view! 

Follow my shop @forever.six.acres on the @shop.LTK app to shop this post and get my exclusive app-only content!

#brickbacksplash #woodenbeams #venthood #hydrangeas #hometohave #myhomestyle #myhomevibe #mycountryhome #countryhomes #farmhousekitchen #countrykitchen #countrysamplerfarmhousestyle #americanfarmhousestyle #amazonhome #founditonamazon #myfarmhousestyle #myneutralhome #neutralfarmhouse #openshelving #vaultedceilings #vaultedceiling 
#liketkit @shop.ltk https://liketk.it/3FpnU
➕Happy Friday➕ Drop a 🙌🏻 if you are exc ➕Happy Friday➕

Drop a 🙌🏻 if you are excited for the weekend! I don’t have any plans this weekend, which is the best kinda weekend! I will be shooting some new content this weekend, but I’m sharing one of my favorite views! 

Hope y’all all have a great weekend! 

Follow my shop @forever.six.acres on the @shop.LTK app to shop this post and get my exclusive app-only content!

#liketkit  @shop.ltk https://liketk.it/3FfXO #farmhousefridays #fridayfarmhousefavorites #farmhousefridays #fridayfarmhousefeels #fridayfarmhousefavorites #myhome2inspire #myhomedesign #myhomecrush #hometohave #openfloorplan #vaultedceiling #woodbeams #farmhouselivingroom #farmhousediningroom #livingroominspiration #livingroominteriors #livingroomstyling #amazonhome #targethome #farmcottagecharm
➕Happy Mother’s Day➕ Hopping on really quic ➕Happy Mother’s Day➕

Hopping on really quickly to tell all the moms out there happy Mother’s Day! The boys all took me out to breakfast and then we came home to hang out together and relax for the day! 

#mothersday2022 #boymom💙 #farmhousekitchen #farmhousekitchendecor #brickbacksplash #shakercabinets #mycottagefarmhouse #simplyfarmhouselove #countryfarmhouse #kitchendesignideas #kitchensofinsta
➕Bluebonnets & Tea Party➕ Well, If you saw my ➕Bluebonnets & Tea Party➕

Well, If you saw my stories, the bluebonnets are all overgrown by grass now, they have seeded out, and Jeremy finally is allowed to mow! 🤣 Hoping there will be even more next year! I rounded up some of my favorite  bluebonnet photos from this year! 👉🏻

On another note, I’ve got a Tea Party to go to this afternoon! I’ll share some in stories! 

#texasbluebonnets #texasfarmhouse #modernfarmhouseexterior #countryfarmhouse #americanfarmhousestyle #americanfarmhouse #farmhouseexterior #boardandbatten #farmhousestyle #farmhouseinspired #farmhousecharm #bhghome #southernlivingmag #mycountryhome #myhomethismonth #myhomecrush #myhomebeautiful #myhometoinspire #homeenvy #homeexterior #jameshardie #exteriorsofinstagram #exteriorinspo #countryhomes
➕Outdoor spaces➕ Did you vote in stories last ➕Outdoor spaces➕

Did you vote in stories last night on which outdoor kitchen I designed? The masonry had to move the start date back to next week, but I’m excited to get it going and share what I can in stories! 

For now, I’ll share this new view of the back porch! Can’t wait to share the other side!! 🙌🏻

Follow my shop @forever.six.acres on the @shop.LTK app to shop this post and get my exclusive app-only content!

#LTKhome #ltkseasonal https://liketk.it/3EIbp #outdoorkitchen #outdoorspace #outdoorspaces #outdoorspacedesign #backporch #backporchsitting #backporchliving #farmhouseporch #farmhouseexterior #boardandbatten #jameshardiesiding #texasfarmhouse #backpatio #outdoorfireplace #outdoorpatio #amazonhome #walmarthome
➕Building 101➕

Todays topic is trim work! I’ll be on stories shortly! I’m at home today with Blaine, he woke up with a fever! I’ve been giving him all the mommy cuddles today, but now he’s sleeping! 

I’ll be going over baseboards, window & door casings, and quickly touch on some other wood work the trim guys did! Also, some things we did ourselves to save money while building! 

Follow my shop @forever.six.acres on the @shop.LTK app to shop this post and get my exclusive app-only content!

#LTKhome https://liketk.it/3EC0J #fauxbeams #woodbeams #vaultedceiling #openfloorplan #farmhousetable #farmhouselivingroom #boardandbattenwall #brickfireplace #farmhousefireplace #building101 #frombuildtobuilt #ourbuildjourney #greatroom #greatroomdesign #farmhouseinteriors #frommyhometoyours #homeinspo4you #homeinteriorsdesign #amazonhome #walmarthome #farmhousehome
Privacy & Cookies: This site uses cookies. By continuing to use this website, you agree to their use.
To find out more, including how to control cookies, see here: Cookie Policy

Copyright © 2022 · Theme by Blog Pixie

Sasha Rose Theme on Genesis Framework


Loading Comments...